Battery switch on travel trailer function is crucial for managing your RV’s power. Understanding how these switches work – whether single-pole, double-pole, or double-pole double-throw – is key to preventing dead batteries and electrical issues. This guide breaks down the operation, troubleshooting, safety, and integration with other systems like solar panels and inverters, empowering you to confidently manage your travel trailer’s electrical setup.
We’ll cover everything from basic operation to advanced troubleshooting, ensuring you can keep your lights on and appliances running smoothly, no matter where your adventures take you. We’ll also delve into the different types of switches available, their pros and cons, and how to choose the right one for your needs. Get ready to become a power management pro!
Upgrading or Replacing a Battery Switch
Upgrading or replacing your travel trailer’s battery switch is a straightforward process that can significantly improve your RV’s electrical system. A faulty or undersized switch can lead to overheating, poor performance, and even fire hazards. Choosing the right replacement and installing it correctly ensures safe and reliable power management.Replacing a battery switch involves disconnecting the old switch, installing a new one with the correct amperage rating, and securely reconnecting the wiring.
This upgrade can improve the efficiency and safety of your electrical system, ensuring reliable power for your appliances and accessories.
Selecting a Replacement Battery Switch
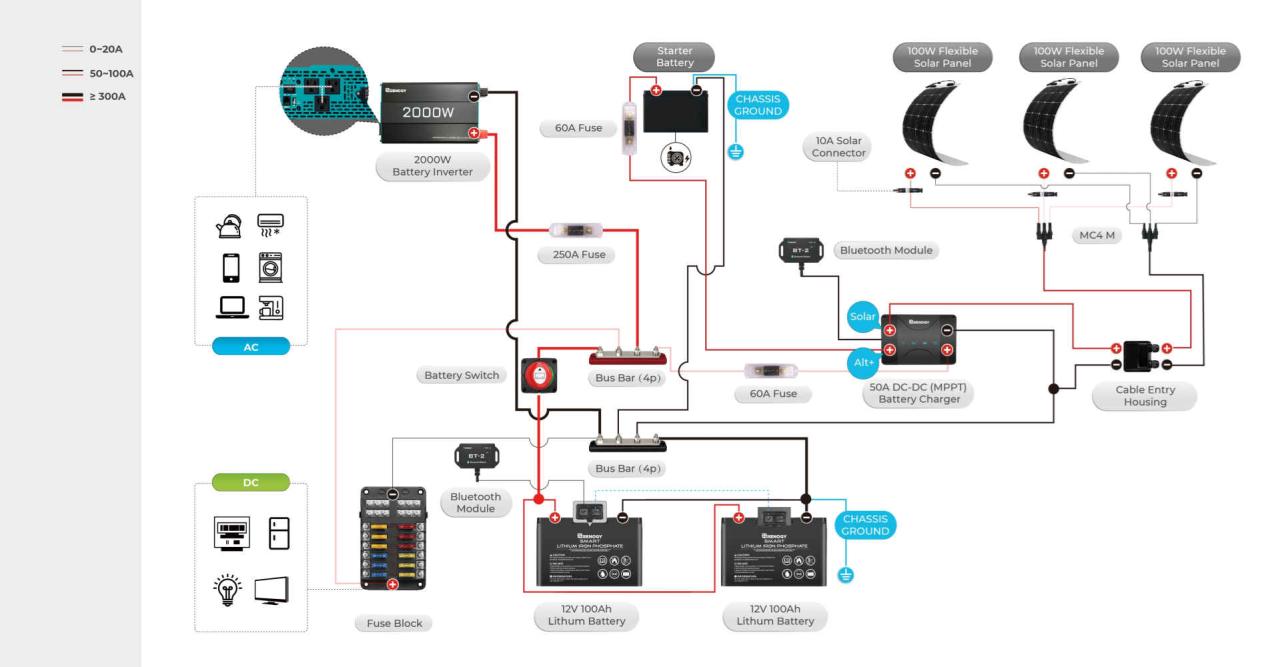
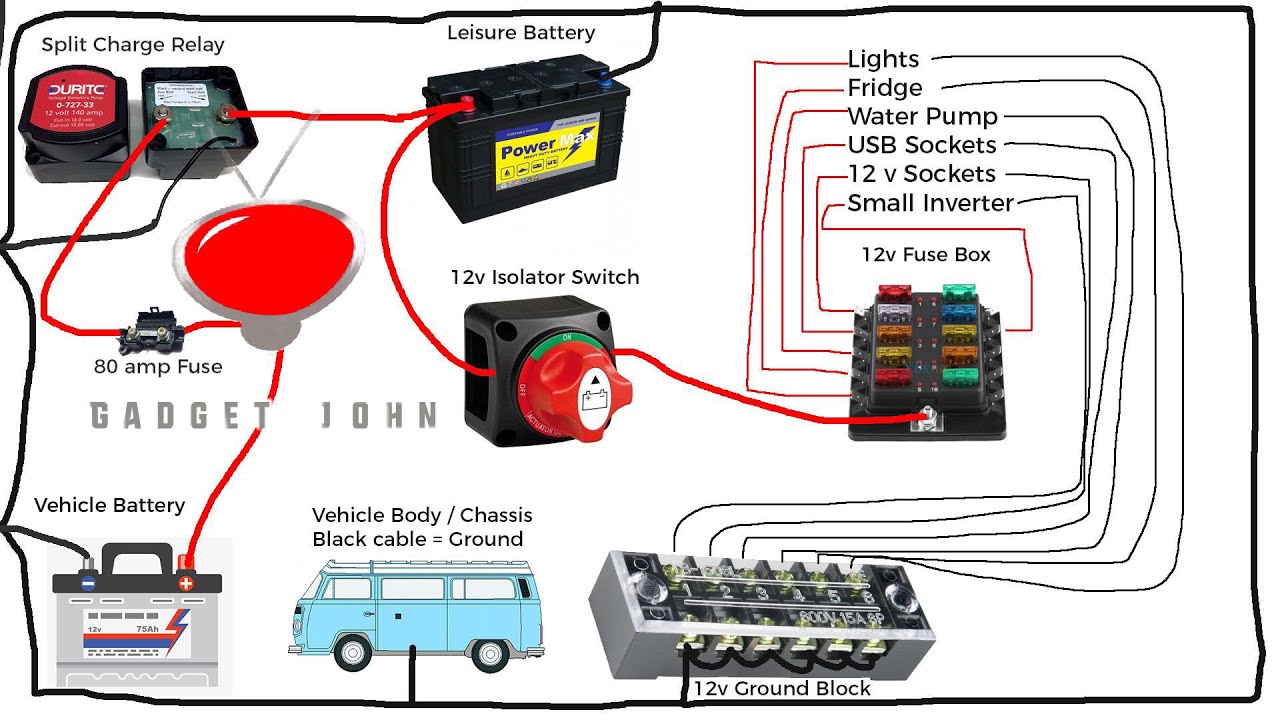
Choosing the right replacement battery switch is crucial for safety and performance. The most important factor is the amperage rating, which must match or exceed the total amperage draw of your trailer’s electrical system. You’ll also want to consider the switch’s construction, including its material and the number of battery banks it can handle. For example, a 200-amp switch would be suitable for a trailer with a high power demand, while a smaller 100-amp switch might suffice for a smaller trailer with fewer appliances.
Always consult your trailer’s wiring diagram to determine the appropriate amperage rating. Look for switches made from durable materials like high-quality plastic or metal to ensure longevity and resistance to damage. Consider features like built-in fuses or circuit breakers for added safety.
Okay, so you’re wondering about your travel trailer’s battery, right? Understanding the battery switch on travel trailer function is key to avoiding a dead battery. It’s basically an on/off switch for your house batteries, letting you disconnect them when not in use to prevent drain. This is super important for conserving power. Now, if you’re still having issues after checking that, maybe take a look at this other resource explaining the battery switch on travel trailer function in more detail; it might have some extra tips for troubleshooting.
Proper battery maintenance is crucial for happy travels!
Safely Disconnecting and Installing the New Switch
Before beginning any electrical work, always disconnect the negative terminal of your battery to prevent accidental shocks or short circuits. This is a critical safety precaution.
- Disconnect the wiring: Carefully disconnect all wires from the old battery switch, taking note of their positions. Use a labeled diagram or take photos to aid in reconnection.
- Remove the old switch: Once the wires are disconnected, remove the old switch from its mounting location. This may involve unscrewing mounting bolts or removing fasteners.
- Mount the new switch: Securely mount the new battery switch in the same location as the old one, ensuring a snug and stable fit. Use the appropriate screws or fasteners.
- Reconnect the wiring: Carefully reconnect the wires to the new switch, matching their positions to the old configuration. Double-check your connections to avoid errors.
- Test the switch: Reconnect the battery’s negative terminal and test the new switch to ensure it functions correctly. Check all circuits to verify proper operation.
Remember, if you are uncomfortable performing this task yourself, it’s best to consult a qualified RV technician. Improper installation can lead to electrical problems or safety hazards.
Okay, so you’re dealing with your travel trailer’s battery, right? Understanding the battery switch on travel trailer function is key to avoiding a dead battery. This switch basically cuts power to your house batteries when you’re not using the trailer, preventing drain. Learning how to properly use it is super important, and if you’re still unsure, check out this other helpful resource on the battery switch on travel trailer function for a more in-depth explanation.
It’ll save you headaches (and battery replacements!) down the road.
Visual Representation of Internal Components: Battery Switch On Travel Trailer Function
Understanding the internal workings of a battery switch is key to proper installation and troubleshooting. This section provides a detailed look at the components and their interaction within a typical battery switch. We’ll explore the materials used and how the electrical current flows through the device.
A typical battery switch, whether it’s a simple two-battery switch or a more complex system, consists of several key components. The most important are the contact points, the terminals, and the internal switching mechanism. These components work together to allow the user to select which battery or combination of batteries are supplying power to the trailer.
Internal Components and Materials
The contact points are usually made of a high-conductivity material, such as silver-plated copper or brass. These materials offer excellent electrical conductivity with minimal resistance, ensuring efficient current flow and minimizing heat generation. The terminals, where the battery cables connect, are often constructed from heavy-gauge copper or brass, chosen for their durability and ability to handle significant amperage. The internal switching mechanism is typically a robust rotary switch, possibly with a spring-loaded mechanism to ensure a positive connection.
The housing is often made from durable, impact-resistant plastic or metal, providing protection from the elements and physical damage.
Cross-Section of a Battery Switch
Imagine a cross-section of a typical two-battery switch. You would see two sets of heavy-gauge terminals, one for each battery. Each set of terminals is connected to a set of contact points within the switch. The rotary switch itself has multiple positions, often labeled “Both,” “Battery 1,” “Battery 2,” and “Off.” In the “Off” position, all contact points are disconnected, interrupting the circuit.
In the “Both” position, both sets of contact points are connected, allowing both batteries to power the trailer. Selecting “Battery 1” or “Battery 2” only connects one battery to the output terminals. The pathway of the electrical current is a direct route from the selected battery terminal, through the corresponding contact point, and then to the output terminal that feeds the trailer’s electrical system.
The entire assembly is encapsulated within a protective housing to maintain safety and durability.
Current Pathway Illustration, Battery switch on travel trailer function
To further clarify, let’s visualize the current flow. When the switch is in the “Battery 1” position, the current flows directly from the positive terminal of Battery 1, through a connecting wire, to a contact point within the switch. From this contact point, the current travels through an internal conductor to another contact point, then to the output terminal, and finally to the trailer’s electrical system.
The negative current follows a similar path, completing the circuit. The other battery is completely isolated in this configuration. The “Both” position simply adds another pathway for current from Battery 2, effectively paralleling the batteries. This allows both batteries to supply power simultaneously.
Mastering your travel trailer’s battery switch is a game-changer for any RV owner. By understanding its function, troubleshooting common problems, and prioritizing safety, you’ll ensure reliable power for all your adventures. From preventing costly repairs to maximizing battery life, the knowledge gained here will make your RV trips smoother and more enjoyable. So, grab your tools, review your diagrams, and confidently tackle any electrical challenges that come your way!
FAQ Overview
What size battery switch do I need?
The amperage rating of your switch should match or exceed the total amperage draw of your appliances and systems. Consult your trailer’s wiring diagram or a qualified electrician for assistance.
How often should I clean my battery switch terminals?
Inspect and clean your battery switch terminals at least once a year, or more often in harsh environments, to prevent corrosion and ensure good electrical contact.
Can I use a battery switch with a lithium battery system?
Yes, but ensure the switch is compatible with the voltage and amperage of your lithium battery system. Some lithium systems may require specific types of switches or additional safety devices.
What should I do if my battery switch is making a clicking sound?
A clicking sound often indicates a weak battery or a problem with the switch itself. Check your battery voltage and inspect the switch for loose connections or corrosion. If the problem persists, replace the switch.
